

How to create a generic expandable settings view with SwiftUI
Recently, I was faced with a task to create a settings view for my app. I wanted to create a minimal settings view implementation that would look like the native settings app on iOS.
In this article, we will create a generic and expandable settings view for your iOS app! With a couple of lines of code, you will easily be able to create a new setting.
My app does not require a lot of settings at the moment, but I have created the setup to be able to easily add new settings once I am done implementing them. Follow along to learn how to create this settings screen!
The code is available in this GitHub repository.
Before we start
We will be working in two files: SettingsView.swift and RootSettingView.swift. The first one will be displaying our settings, and the RootSettingView will be responsible for displaying the detailed setting screen after the user taps one of the settings.
Setting up the struct
For this to work, we will only need to implement one Setting struct. The end goal is to be able to loop through each of the settings using a ForEach to display all of them. Thus, our Setting needs to conform to the Hashable protocol. Thankfully, each of our properties are already hashable, so we do not need to do anything extra for this to work.
struct Setting: Hashable {
  let title: String
  let color: Color
  let imageName: String
}
As you can see, our Setting will have three properties—title,color, and imageName.
Declaring the settings
Once we have our srtuct set up, we can declare a settings variable in a SettingsView.swift file.
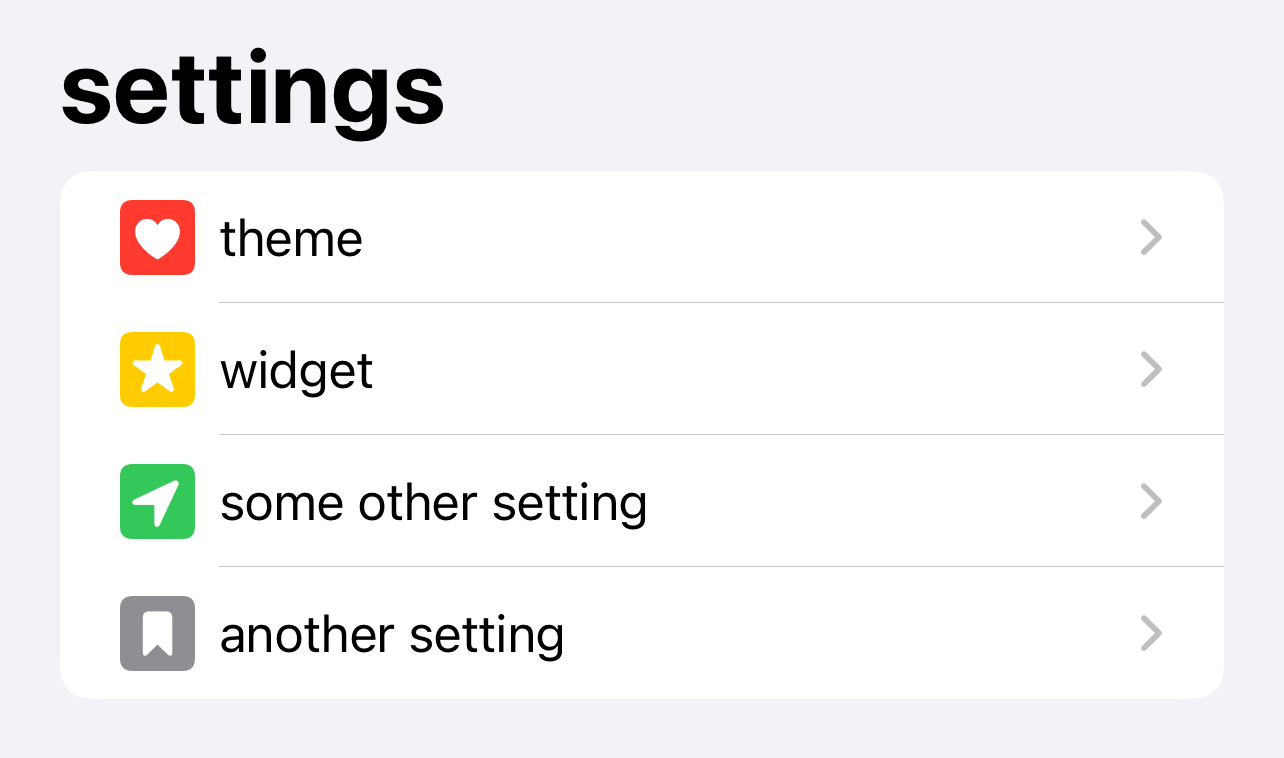
let settings: Array<Setting> = [
    Setting(title: "theme", color: .red, imageName: "heart.square.fill"),
    Setting(title: "widget", color: .yellow, imageName: "star.square.fill"),
    Setting(title: "some other setting", color: .green, imageName: "location.square.fill"),
    Setting(title: "another setting", color: .gray, imageName: "bookmark.square.fill")
]
Here, we declare an Array of type Setting that only has four settings. They have a title, a color, and a name for the image.
The title is what the setting will be called in our settings list, the color parameter is the color of the icon, and the image name is the name of the icon from SF Symbols.
Displaying the icons
You probably already want to just write the ForEach to display these, but there is something else we need to do. To make the settings look more like the native Settings app, we need to be able to apply the color to the settings icon. This is why we passed both color and the image name when we created our settings array. Let's write a View that will apply our desired color to the given icon!
struct SettingImage: View {
  let color: Color
  let imageName: String

  var body: some View {
    Image(systemName: imageName)
      .resizable()
      .foregroundStyle(color)
      .frame(width: 25, height: 25)
  }
}
Here, we take in our color and imageName and initialize an Image with that name, and apply the foregroundStyle() modifier to apply our color. It is that simple 😅
Almost there ... routing the settings
Now, let's zoom out from our SettingsView and create a new file RootSettingView. This file will be responsible for sending the user to the right setting detail view once they tap on a given setting. Since we only have 4 settings, the view is really simple:
struct RootSettingView: View {
  let viewToDisplay: String
  var body: some View {
    switch viewToDisplay {
    case "theme":
      ThemeSettingView()
    case "widget":
      WidgetSettingView()
    case "some other setting":
      SomeOtherSettingView()
    case "another setting":
      AnotherSettingView()
    default:
      RootSettingView(viewToDisplay: "")
    }
  }
}
Here, we are using a switch statement to display the right view. For example, if we want to display ThemeSettingView, we will pass theme string to our RootSettingView. This will make more sense once we will complete the last step!
Finally ... displaying the settings!
Okay, back to our SettingsView. We have not done anything in it yet, so let's write some code! As you might have guessed, we will need to use a ForEach loop and a NavigationStack since in the real app, this will really be the only context in which you would use a settings view.
NavigationStack {
  List {
    ForEach(settings, id: \.self) { setting in
      // TODO
       }
      }
  .navigationTitle("settings")
}
Here, we just loop through our settings array, so let's display them now! Inside this ForEach, write
NavigationLink(destination: RootSettingView(viewToDisplay: setting.title)) {
  HStack {
    SettingImage(color: setting.color, imageName: setting.imageName)
    Text(setting.title)
  }
}
Each item in our list will be a link to a RootSettingView! We also pass a title for a setting being displayed as a parameter to viewToDisplay. As you might remember, the RootSettingView is set up in such a way that it displays the correct view depending on the string it gets. So, we will always display the right setting on tap.
And finally, the HStack has an image and a text, which is our setting cell.
Conclusion
With this setup, you can now easily add new settings by adding a Setting object to our array, and then adding a new case to the switch statement in the RootSettingView!
Thank you for reading, and I hope you enjoyed this article! 💛